
The Workbook Connect user guide
Everything from installing the add-in to committing your first change: how to connect Excel to SQL Server, Azure SQL, Microsoft Fabric or Databricks, load a table, edit it like a spreadsheet, and write it back.
About Workbook Connect
Workbook Connect is an Excel add-in that lets you load a database table into a worksheet, edit it the way you would edit any spreadsheet, and write your changes back to the database. There is no export, no import file, and no copy and paste step in between.
It is built for the people who actually own the data, product managers, finance and operations teams, data stewards, rather than for database administrators. If you can use Excel, you can use Workbook Connect.
How it works
- Connect to your database from the Excel ribbon.
- Pick a table. Workbook Connect loads it into its own worksheet, formatted as a table.
- Edit the cells you need to change. Add rows at the bottom, or mark rows for deletion.
- Commit. Workbook Connect works out exactly which rows changed and writes only those back.
Your workbook is never the source of truth, the database is. You can close Excel, reopen it, reconnect and reload at any time.
Which databases are supported
| Platform | Notes |
|---|---|
| Microsoft SQL Server | On-premises or hosted. All editions. |
| Azure SQL Database | Including Azure SQL Managed Instance. |
| Microsoft Fabric | Fabric Warehouse and Fabric SQL Database. |
| Databricks SQL Warehouse | Unity Catalog only. Needs the Databricks ODBC driver, see Installing Workbook Connect. |
| PostgreSQL | Self-hosted or managed (Azure Database for PostgreSQL, Amazon RDS, Supabase and others). The driver is built in. |
| Databricks Lakebase | Lakebase Autoscaling projects. Has its own entry in the connect dialog and signs in with Microsoft Entra ID, see Databricks Lakebase. The driver is built in. |
Installing Workbook Connect
What you need
| Requirement | Detail |
|---|---|
| Windows | Windows 10 or Windows 11. |
| Microsoft Excel | Desktop Excel (Microsoft 365, 2019, 2021 or later). Excel for the web and Excel for Mac are not supported. |
| .NET Framework | Version 4.7.2 or later. Present on most business machines already. |
| VSTO Runtime | Visual Studio 2010 Tools for Office Runtime. Download it from Microsoft. |
| Administrator rights | Not required. Workbook Connect installs for your user account only. |
The installer checks for the .NET Framework and the VSTO Runtime before it starts. If either is missing it tells you which one and gives you the download link, so you can install it and run setup again.
Install the add-in
- Download the installer from the download page.
- Close Excel completely before you run it.
- Run
WorkbookConnect_Setup.exeand follow the prompts. No administrator password is needed. - Start Excel. You will see a new Workbook Connect tab in the ribbon.
If the tab does not appear, see Troubleshooting.
Extra step for Databricks only
Connecting to a Databricks SQL Warehouse needs the Databricks ODBC driver, which Databricks distributes separately. Workbook Connect does not install it for you, because its installer requires administrator rights and Workbook Connect deliberately does not.
- Download the 64-bit Windows driver from databricks.com.
- Install it. This step does need administrator rights, so ask your IT department if you do not have them.
- Restart Excel.
The connect dialog shows you whether the driver was found, so you never have to guess.
The ribbon
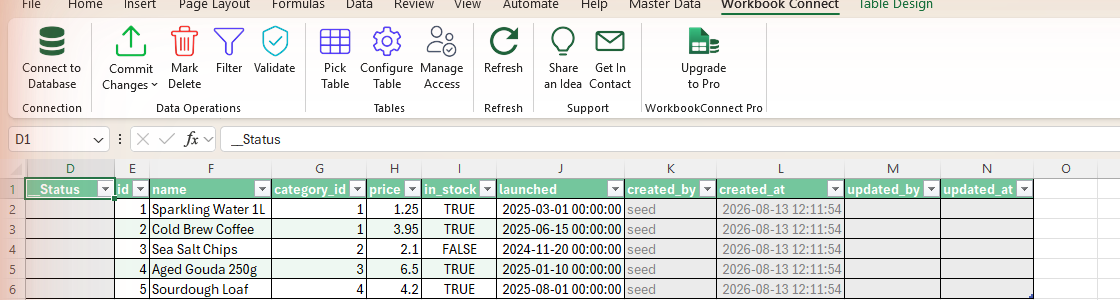
| Button | What it does |
|---|---|
| Connect to Database | Opens the connection dialog. |
| Commit Changes | Writes your edits back. Choose the current sheet or all sheets. |
| Mark Delete | Marks the selected rows for deletion on the next commit. |
| Filter | Opens the Filter Builder so you load only the rows you need. |
| Validate | Checks your edits against the validation rules without committing. |
| Pick Table | Choose which table to load. |
| Configure Table | Configurator only. Column setup, keys, lookups and rules. |
| Manage Access | Configurator only. Who may configure and who may only edit. |
| Refresh | Reloads the current sheet from the database. |
| Share an Idea / Get In Contact | Send feedback or a support request to the Workbook Connect team. |
Connecting to your data
Click Connect to Database on the Workbook Connect tab. The dialog changes depending on which platform you choose, so start with the Database type box at the top.
There are four entries. The first covers SQL Server, Azure SQL and Microsoft Fabric together, because they all speak the same protocol. The second is Databricks SQL Warehouse, the third is PostgreSQL, and the fourth is Databricks Lakebase, which runs on PostgreSQL but signs in through your Databricks workspace.
SQL Server, Azure SQL and Microsoft Fabric
Fill in the server name, optionally the database, and choose how you want to sign in.
| Field | What to enter |
|---|---|
| SQL Server | The server name, for example myserver.database.windows.net or mywarehouse.fabric.microsoft.com. |
| Database | Optional. Leave it empty and you can pick from a list after connecting, or open the dropdown to load the list now. |
| Authentication | How you prove who you are. See the table below. |
Sign-in methods
| Method | When to use it |
|---|---|
| Microsoft Entra ID (MFA) | The usual choice for Azure SQL and Fabric. A Microsoft sign-in window opens and you approve it with your normal multi-factor prompt. Nothing is stored as a password. |
| SQL Server Authentication | A username and password created inside the database itself. Common for on-premises SQL Server. You can tick "Remember password" to store it securely on your PC. |
| Windows Integrated | Signs in silently as your Windows account. Typical on a company network with on-premises SQL Server. |
| Azure AD Password | Your work email and password, without a multi-factor prompt. Only works if your organisation permits it. |
| Azure AD Service Principal | An application identity rather than a person. Your IT team will give you the client ID and secret. |
| Azure Managed Identity | For machines running inside Azure with an assigned identity. No credentials to enter. |
| Azure AD Default | Tries the Azure identities already available on the machine, in order. Mostly used by developers. |
Databricks SQL Warehouse
Choose Databricks SQL Warehouse and the dialog swaps to the Databricks fields.
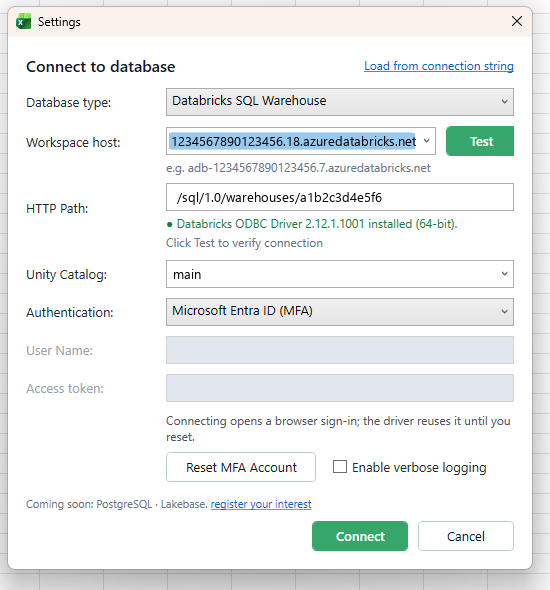
| Field | What to enter |
|---|---|
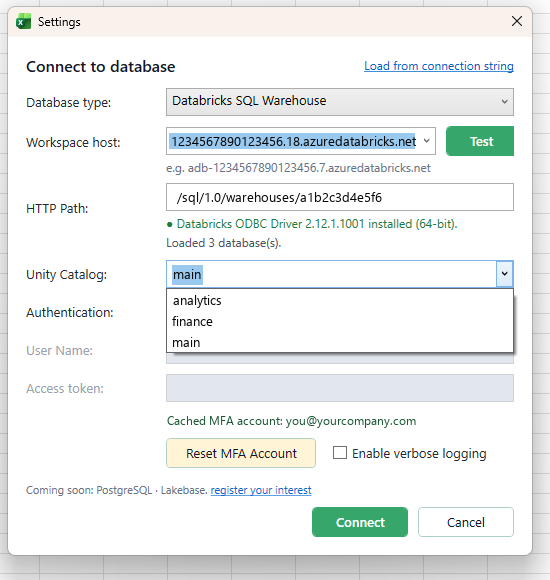
| Workspace host | Your workspace address without https://, for example adb-1234567890123456.7.azuredatabricks.net. |
| HTTP Path | Identifies the specific SQL warehouse, for example /sql/1.0/warehouses/a1b2c3d4e5f6. Copy it from the warehouse's Connection details tab in Databricks. |
| Unity Catalog | The catalog holding your tables. Open the dropdown after a successful test and Workbook Connect lists the catalogs you can see. |
| Authentication | Personal access token or Microsoft Entra ID. See below. |
The driver status line
Under the HTTP Path there is a line telling you whether the Databricks ODBC driver is installed. Green with the version number means you are ready to connect. Red means the driver is missing, and the line becomes a download link. See Installing Workbook Connect.
Signing in with a personal access token
A personal access token (PAT) is a long generated string that acts as a password for your Databricks workspace. Create one in Databricks under User Settings, then Developer, then Access tokens.
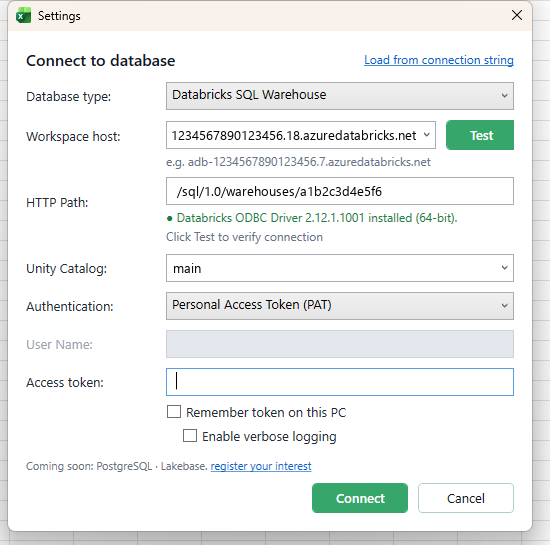
Paste the token into Access token. Tick Remember token on this PC and it is stored encrypted for your Windows account, so you do not have to paste it again.
Signing in with Microsoft Entra ID
This is the simpler option for most people: there is nothing to copy, paste or store.
Choose Microsoft Entra ID (MFA) and click Test or Connect. Your web browser opens a Databricks sign-in page, which hands you on to the normal Microsoft sign-in and your usual multi-factor prompt. Approve it and the browser tab can be closed, Excel picks the connection up by itself.
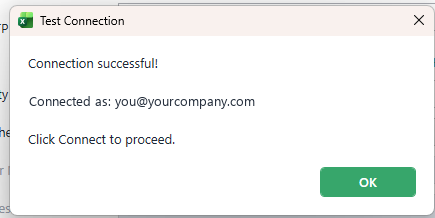
After the first sign-in the driver remembers you, so later connections are silent, even after restarting Excel. The dialog shows which account is cached. To sign in as somebody else, click Reset MFA Account. The next connection sends you back through the browser.
PostgreSQL
Choose PostgreSQL and the dialog swaps to the PostgreSQL fields. There is no driver to install: it ships inside Workbook Connect.
| Field | What to enter |
|---|---|
| Host | The server address, optionally followed by the port, for example db.example.com or localhost:5432. Without a port, the PostgreSQL default 5432 is used. |
| Database | Optional. Leave it empty and you can pick from a list after connecting. |
| User name | A PostgreSQL role that can read the tables you want to edit and write the ones you want to change. |
| Password | The password for that role. On Azure Database for PostgreSQL you can paste a Microsoft Entra access token here instead. |
Workbook Connect only lists tables your role has privileges on, and every commit runs as one PostgreSQL transaction, exactly as it does on SQL Server. There is no rowversion equivalent, so updates and deletes are matched on the primary key: if another user changed or removed a row since you loaded it, the commit reports a conflict and asks you to refresh.
Databricks Lakebase
Choose Databricks Lakebase and the dialog swaps to the Lakebase fields. Workbook Connect supports Lakebase Autoscaling projects, the kind with branches and computes that scale to zero.
| Field | What to enter |
|---|---|
| Lakebase compute | The host of your branch's compute, for example ep-xxxx.database.westeurope.azuredatabricks.net. Copy it from the Connect dialog of that compute in the Lakebase app. |
| Workspace host | The Databricks workspace that owns the Lakebase project, for example adb-1234567890123456.7.azuredatabricks.net. |
| Database | The branch's database, databricks_postgres unless you created another. Leave it empty and you can pick from a list after connecting. |
| Authentication | Always Microsoft Entra ID (MFA). There is no user name, password or token to enter. |
Click Test or Connect. The first time, your web browser opens the Microsoft sign-in page and your usual multi-factor prompt. Workbook Connect then asks your workspace for a database token, which lasts an hour, and renews it silently before it runs out, so there is nothing to copy, paste or store.
After that you stay signed in, even after restarting Excel, and the dialog shows which account you are signed in as. To sign in as somebody else, click Reset MFA Account.
A compute that has scaled to zero wakes up when you connect, so the first connection can take a little longer. The connection is always encrypted, which is why the encryption options are hidden for Lakebase. Once connected, everything works as described for PostgreSQL above: you only see the tables your role has privileges on, and every commit runs as one transaction.
Choosing a catalog or database
Once the connection has been tested, open the catalog or database dropdown and Workbook Connect loads the list of those you are allowed to see.
Recent connections
Workbook Connect remembers your last ten connections and fills the dialog in for you next time. Pick an earlier one from any of the dropdowns and the whole set of fields is restored together.
Roles: who can do what
Workbook Connect has two roles, and they apply per database. Being a Configurator on one database does not make you a Configurator on another.
The two roles
| Role | What it means |
|---|---|
| Configurator | Sets things up for everybody else: which columns are visible, which are editable, which column is the key, which columns get dropdowns, what the validation rules are, and who has which role. Changes made here are shared with every user of that database. |
| User | Loads tables, edits data, and commits changes. Cannot change the setup. This is the right role for most people. |
What each role can do
| Action | Configurator | User |
|---|---|---|
| Connect to the database | Yes | Yes |
| Load a table and read data | Yes | Yes |
| Edit cells, add rows, delete rows | Yes | Yes |
| Commit changes | Yes | Yes |
| Use dropdowns and filters | Yes | Yes |
| Be stopped by validation rules | Yes | Yes |
| Open Configure Table | Yes | No |
| Create or edit validation rules | Yes | No |
| Open Manage Access | Yes | No |
| Change other people's roles | Yes | No |
Setup mode, and how roles get assigned
A database that nobody has configured yet is in Setup mode. While it is in Setup mode, anyone who connects can use Configure Table, so the first person can get things working.
As soon as somebody is added as a Configurator in Manage Access, the database leaves Setup mode and normal rules apply. From then on, only listed Configurators can change the setup.
If you connect to a configured database and you are not on the list, you are added automatically as a User. You can load and edit data straight away, you simply cannot change the setup.
Free and Pro
Everything most people do every day, connecting, loading, editing, validating and committing, works on the free version, with no row limits.
Two features need a Pro licence, and both are about managing other people rather than working with data:
- Manage Access, adding, removing and changing roles.
- Validation Designer, creating and editing validation rules.
Rules and roles that already exist are always enforced, on every licence. Pro only decides who is allowed to change them. See the pricing page for what each plan costs.
Everyday use
Prefer to watch? This two-minute video covers everything in this section: opening a table, editing, dropdowns, adding and deleting rows, validating and committing.
Read the transcript
Choosing a table
Click Pick Table. Start typing to narrow the list, then press Enter or click OK.
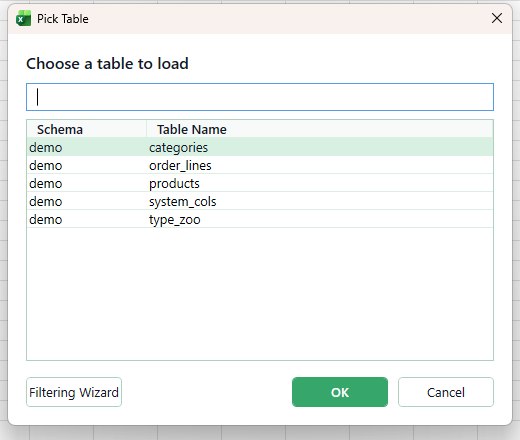
Each table opens in its own worksheet, named after the table. You can have several tables open at once.
The first time a table is opened
The first time anybody in your organisation opens a particular table, Workbook Connect asks somebody to confirm which column identifies a row. It suggests an answer from the database, but asks you to confirm because getting it wrong would mean updating the wrong rows later.
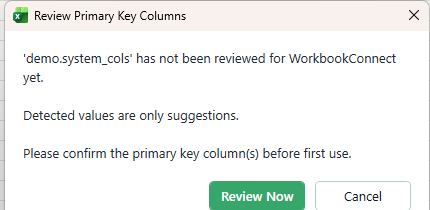
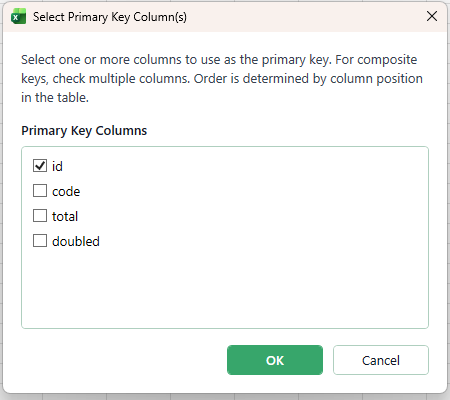
This is asked once per table, not once per person. Everyone who opens it afterwards goes straight to the data.
Reading the sheet
A loaded table looks like a normal Excel table, with a few Workbook Connect additions.
| What you see | What it means |
|---|---|
| Green header row | The table Workbook Connect manages. Do not type outside it, anything below or beside it is ignored. |
__Status column | Shows what will happen to each row on the next commit. I means a new row, D means marked for deletion, and U lists the columns you changed. |
| Grey columns | Read-only. Usually the database fills these in automatically, created and updated stamps, or values the database generates. You cannot type in them. |
| White columns | Yours to edit. |
| Cells with a dropdown arrow | A lookup column. See Dropdowns and lookups below. |
Editing
Edit as you would in any spreadsheet: type over a cell, paste a block, fill down, undo. Workbook Connect keeps track in the background.
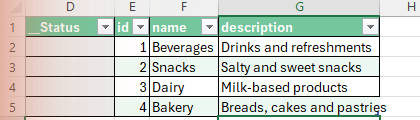
- To add a row, type into the first empty row directly below the table. Excel extends the table for you.
- To delete a row, select any cell in it and click Mark Delete. The row stays visible, marked
D, until you commit. - To undo everything, click Refresh and choose to discard your changes.
Dropdowns and lookups
Where a column points at another table, a category, a status, a customer, a Configurator can turn it into a dropdown. You then choose a readable name instead of remembering a number, and Workbook Connect stores the correct underlying value for you.
Pick from the dropdown rather than typing, so the value always matches something that exists.
Validation
Your organisation may define rules about what is acceptable, a price that cannot be negative, a code that must follow a pattern, a field that cannot be left blank. These are checked before anything is sent to the database.
Click Validate at any time to check without committing. Committing runs the same checks automatically. If anything fails, the commit stops and nothing is written. Fix the cells listed and commit again.
Loading fewer rows with the Filter Builder
Large tables do not have to be loaded whole. Click Filter to build a condition, and only matching rows are loaded.
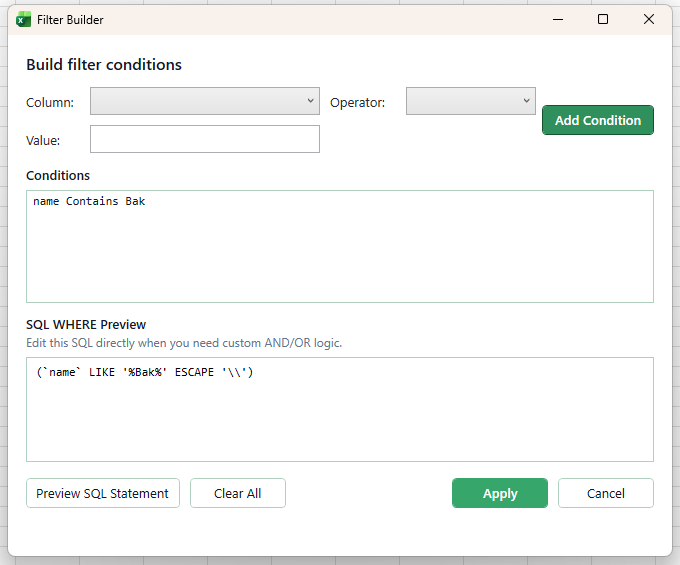
- Choose a column.
- Choose an operator, contains, starts with, equals, is null, and so on.
- Type a value and click Add Condition.
- Repeat for as many conditions as you need, then click Apply.
The SQL is shown as you build it, and you can edit it directly if you need AND/OR logic the buttons do not cover.
Committing your changes
Click Commit Changes and choose Commit Current Sheet. Workbook Connect first tells you exactly what it is about to do.
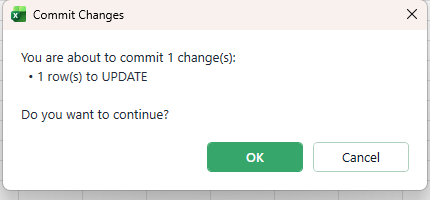
Check the numbers. If they are not what you expect, click Cancel, nothing has been sent yet.
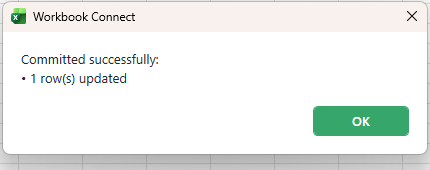
Validation runs first, across the whole sheet. If any row fails, the commit is blocked and nothing at all is written, so an invalid row can never reach your database.
On SQL Server, Azure SQL Database, Fabric SQL Database, PostgreSQL and Databricks Lakebase the write itself runs as a single transaction, so if the database rejects a row the whole commit is rolled back and your edits stay on the sheet for you to correct. Fabric Warehouse and Databricks SQL Warehouse do not offer that transaction, so there a failure part-way can leave earlier rows written. Workbook Connect reports what was applied. See Known limitations with Databricks.
Commit All Sheets
If you have several tables open, Commit All Sheets commits them in one action.
- Only sheets belonging to your current connection are committed. Sheets loaded from a different server or database are skipped and reported, not silently ignored.
- If any sheet fails validation, nothing is committed. Fix it and try again.
- Each sheet is committed separately, so the outcome is reported per sheet.
Refreshing, and unsaved changes
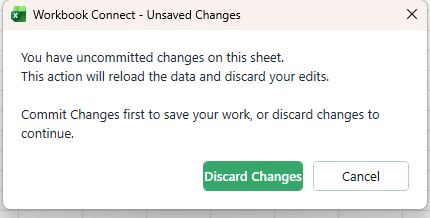
Click Refresh to reload the sheet from the database. If you have uncommitted edits, Workbook Connect warns you before discarding them.
When something goes wrong
| Message | What it means and what to do |
|---|---|
| A different number of rows than expected | Somebody else changed one of your rows after you loaded it. Workbook Connect refuses to overwrite their work. Refresh to get the current values, then reapply your change. |
| Validation errors before commit | One or more cells break a rule. Nothing was sent. Correct the listed cells and commit again. |
| The connection has changed | The sheet was loaded from a different database than the one you are connected to now. Reconnect to the original database, or reload the table. |
| Finish editing the current cell | You are still typing in a cell. Press Enter or Escape and try again. |
| A commit failed part-way | On SQL Server, Azure SQL and Fabric SQL Database nothing was written, the whole commit was rolled back and your edits are still on the sheet. On Fabric Warehouse and Databricks, check the reported counts to see what was applied before you retry. |
For Configurators
This section applies only if you are a Configurator. If Configure Table and Manage Access are greyed out or blocked for you, you are a User and can skip it.
Read the transcript
Configure Table
Configure Table decides what everybody else sees and can change. Your choices are stored centrally and shared with all users of that database.
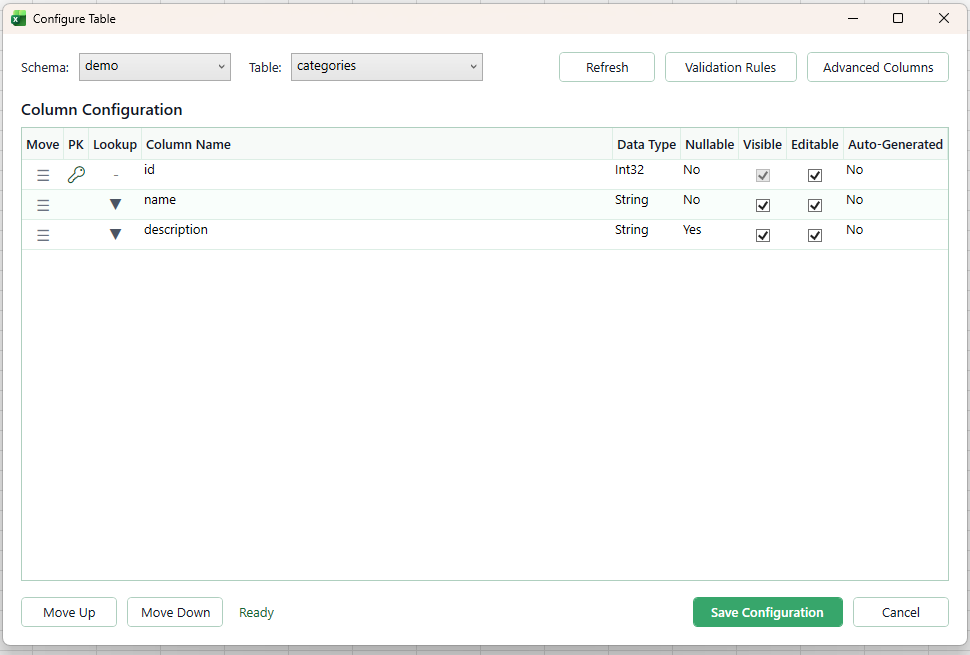
| Column | What it controls |
|---|---|
| Reorder | Drag to change the order columns appear in Excel. |
| PK | The key icon marks the column or columns that identify a row. |
| Lookup | Turn a column into a dropdown driven by another table. |
| Data Type / Nullable | Read from the database. Shown for information. |
| Visible | Whether users see the column at all. Hide technical columns nobody needs. |
| Editable | Whether users may type in it. |
| Auto-Generated | Information only, marks columns the database fills in itself. |
Some columns cannot be made editable no matter what you tick. Workbook Connect locks the checkbox and the tooltip explains why: the column is computed, is a concurrency stamp, is generated by the database, or the connected account has no permission to update it.
Use Validation Rules to define the checks that run before commit, and Advanced Columns to map optional columns such as created and updated stamps.
Manage Access
Manage Access lists everyone who has connected to this database and lets you set each person to Configurator or User. It also shows a history of who changed what.
Adding the first Configurator takes the database out of Setup mode and switches on the normal rules, so do this once your setup is working.
You can also export the whole configuration, column setup, lookups, rules and roles, to a file, and import it into another database. This is the quickest way to promote a setup from test to production.
Troubleshooting
The Workbook Connect tab is missing
- Close Excel completely and reopen it.
- Check File, then Options, then Add-ins. If Workbook Connect is listed under Disabled Application Add-ins, choose COM Add-ins from the Manage box, click Go, and tick it.
- Confirm the VSTO Runtime is installed, see What you need.
The connection fails
| Symptom | What to check |
|---|---|
| Server not found or not reachable | Check the server name for typos. If you are off the company network, check whether you need a VPN. |
| Login failed | The account is correct but has no rights on that database, or the password has changed. Confirm with whoever manages the database. |
| A sign-in window appears and nothing happens | Look for a browser window or tab waiting behind Excel, it may need your multi-factor approval. |
| It worked yesterday and not today | Your password or token may have expired. For Entra ID, click Reset MFA Account and sign in again. |
Databricks: the driver is missing
If the driver status line in the connect dialog is red, the Databricks ODBC driver is not installed. Follow Extra step for Databricks only. The line becomes a download link you can click directly.
If you installed the driver and the line is still red, check that you installed the 64-bit version and restarted Excel.
Databricks: the browser sign-in does not complete
The Databricks sign-in returns to Excel through a local port on your machine. If another program is already using that port, the sign-in never finishes. Close other database or developer tools and try again, or use a personal access token instead.
The licence has expired or is not valid
Workbook Connect checks your licence when you connect. If it reports an expired or inactive licence, your access has been switched off centrally. Contact whoever manages Workbook Connect in your organisation, or use Get In Contact on the ribbon.
Excel seems frozen during a load or commit
Large tables can take a while, and a Databricks warehouse that has gone to sleep needs a few seconds to wake. Give it a moment before deciding it has hung. If Excel is genuinely stuck, close it without saving. Because your changes are only written on commit, nothing is left half-applied in the database.
Getting help
Use Get In Contact on the ribbon to reach the Workbook Connect team directly, or Share an Idea to suggest an improvement. Both open a short form inside Excel. You can also contact us here.
Known limitations with Databricks
Databricks support is newer than the SQL Server support, and one difference is worth knowing about. It does not affect whether your data is written correctly.
Simultaneous-edit detection works differently
On SQL Server, Azure SQL and Fabric SQL Database, Workbook Connect detects when somebody else changed a row while you had it open and refuses to overwrite their work.
On Databricks it does this too, by a different route: before it writes anything, it checks that every row you are updating or deleting is still there. If one has gone, the whole commit is refused, nothing is written, and your edits stay in the sheet for you to look at.
The difference is that this is a check taken just before writing rather than a lock held over your rows, because Databricks does not hold rows still between statements. It catches the case that actually happens, where you loaded the sheet a while before committing. A change made in the same moment as your commit can still get through.
A commit is not one transaction
Databricks SQL runs each statement on its own, without the wrapping transaction that SQL Server, Azure SQL and Fabric SQL Database provide. Validation still gates the whole sheet, so nothing is written unless every row passes, but once writing starts a failure part-way can leave earlier statements applied. Workbook Connect reports that state rather than claiming a clean rollback, so check the reported counts before you retry.


Still stuck?
If something here does not match what you see, or you hit a problem this guide does not cover, use Get In Contact on the Workbook Connect ribbon or send us a message. We answer support questions on the free plan too.